A hydrophone is a microphone designed to be used underwater. When Colin Hart, recordist of the Submerged library, first learned about hydrophone recording, he was eager to explore a new world of sound. But he also found that hydrophones and working with water presented a new set of challenges.
In the video above, Hart offers some basic tips and tricks for recording submersions with a hydrophone. For a more in-depth guide, read "Fundamentals of Hydrophone Recording" below:
Fundamentals of Hydrophone Recording
by Colin Hart & Noelle DiMarco
Disclaimer: The article below is composed of the opinions of the authors who are drawing from personal research and experience. Techniques can always be debated, and this article should not be seen as purely factual. Your mileage may vary.
-
When I first discovered hydrophone recording, I was wide-eyed with the thought of exploring a whole new sonic world! I could now hear things I’ve never heard before and record things I’ve only ever experienced underwater - I was hooked! I tried building a few hydrophones at home with limited success... It was enough to tickle my curiosities, though, and I wanted more. So I bought a “real” hydrophone and started recording.
Turns out, it’s not quite as easy as I thought it would be! It was one thing to go out and record whatever cool stuff I heard coming through my headphones, but it was another thing altogether to figure out how to get the specific sounds I was searching for. In my mind, it wouldn’t be that much different from above ground recording - point, tweak, and record, right?
Well, obviously nothing is that simple. Our brains (or at least mine) aren’t used to thinking of acoustics in terms of how they work underwater. Totally different ballgame! So I had to completely re-learn everything I knew about mic placement and performance before I could even start capturing quality recordings (read: recordings useful for anything other than my own playback enjoyment).
This article hopes to shed some light on the world of hydrophones and underwater recording so that you can get a head start on being prepared for your own recordings!
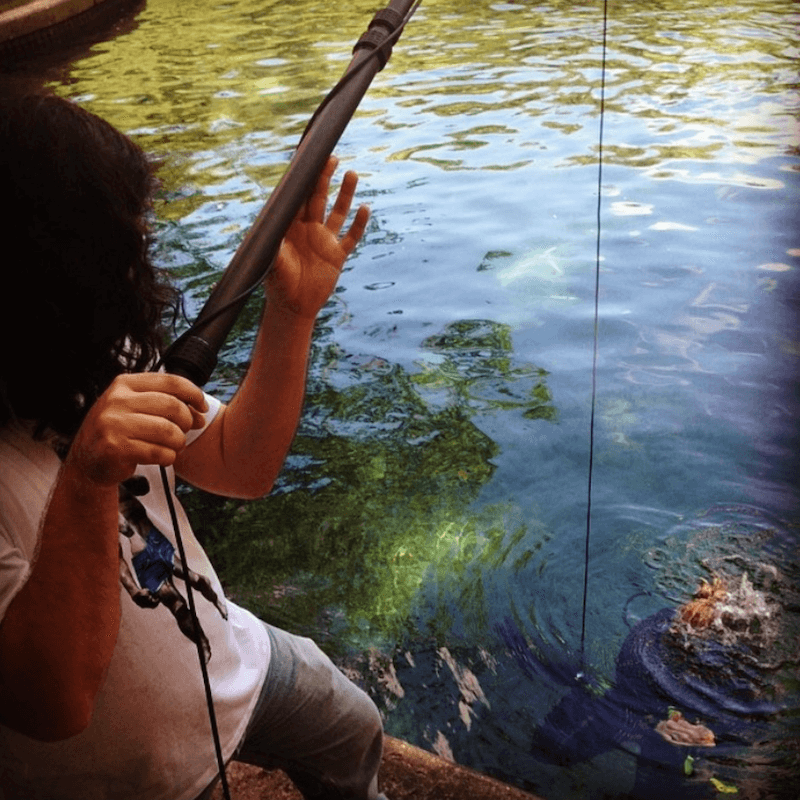
Creating Submerged: Assistant Recordist Álvaro Aparicio capturing vocalizations by Sarah Swan.
Knowing Your Microphone
Just like every other microphone, hydrophones come in various shapes and sizes. Each has its use and should be handled differently. Knowing how your model of hydrophone works is imperative to achieving a solid recording. If you don’t already have a hydrophone, I would start this research before choosing one. Figure out what types of things you want to record, what you want to record into (recorder, preamp, etc.), and any other special needs you might have before you settle on a model to buy.
To that end, if your end goal is just to get some bubbles or surface movement and you don’t need to be in deep water, you might even have the same or even better luck using a standard microphone covered with a condom (non-lubricated!) or thin “balloon animal” balloon.
- Sensitivity: Hydrophones are basically just waterproof contact mics, so in general, hydrophones are very sensitive to touch. Be careful when it’s connected to your recorder - a hard hit might overload the input and potentially damage your circuitry. Depending on what you’re recording, you may have to crank your gain to get a good level.
- Impedance: Many hydrophones are high impedance and need to be converted to work with a standard microphone preamp. I mainly use an Aquarian H2a hydrophone, which doesn’t require any conversion. Make sure you know what your microphone needs before you head out to record.
- Frequency Response: Most professional hydrophones don’t have even close to a flat response curve - and you don’t want them to either! The underwater world is FULL of high frequencies, so if your mic had a flat response, it would seem like it had way too much high end.
- The Physics Of Sound In Water: This is a mountain of a subject, and there’s a mountain of papers and essays about it if you want to read up more on it. We’ll keep it really simple here. Basically, sound travels MUCH faster in water than air. Because of that, they tend to “separate” like they do in metal and other solid objects. Consider how a space phone works (or the slinky trick). If you hit one end sharply, you get a sort of “laser” sound. This happens from the frequencies separating in the metal more quickly than they do in air, so the high end frequencies reach the end of the spring before the low end ones do. A similar effect occurs with sound in water.
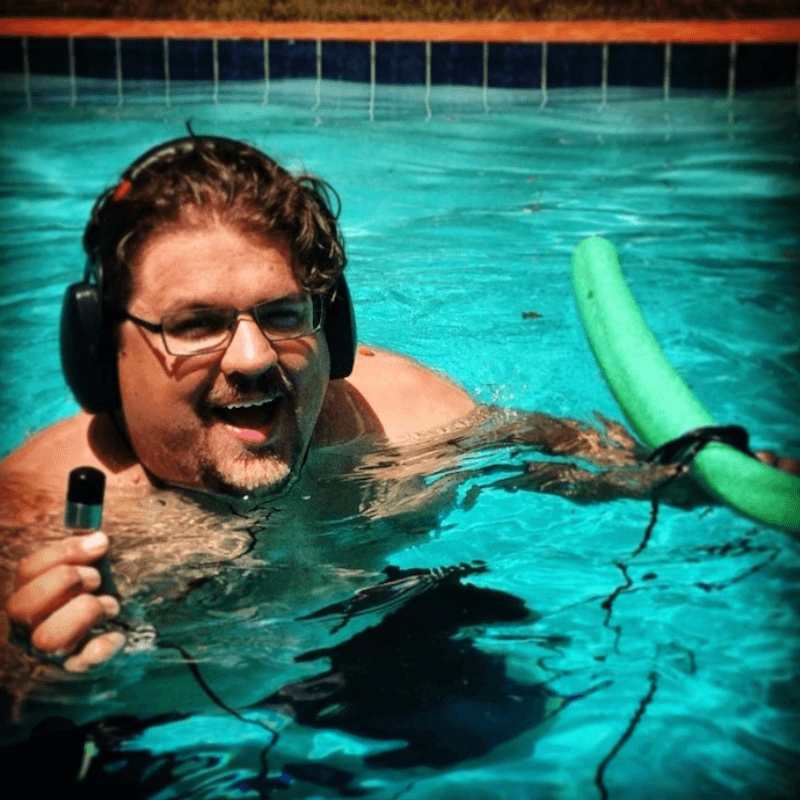
Colin getting to know his mic!
Session Prep
Being prepared can make the difference between a totally successful day and a day playing in the water to no productive end. Don’t get caught unprepared!
- Know Your Location: Do a location scout! Perhaps even drop the mic in at multiple spots around the water to identify potential noise sources. In open water, they can be very difficult to identify and/or control - be sure to consider traffic, people, etc. If you’re doing your recording on a sunny, warm Saturday afternoon, but you scouted on a cold, overcast Wednesday morning, chances are your environment will be different...
- Prepare Your Gear: Waterproof everything! No matter how careful you are, stuff will inevitably get wet. Make sure to take proper precautions, including bringing towels, zip top bags, garbage bags, pelican cases - whatever you need to make conditions safe for your gear. Same goes for you! Secure non-waterproofed gear far away from the water. Wear a bathing suit, bring a towel and dry clothes for after, etc. Also, if it’s feasible (or a high stakes gig), make sure to bring backup gear. Something always goes wrong - whether you forget something, or a piece of gear goes down - be prepared for the worst and hope for the best!
- Prepare Your Mind: Recognize what your preconceived notions are about “underwater sounds.” These preconceptions can help you and hinder you depending on your end goal. You can’t expect to find the sounds you’re used to hearing in movies. Fish don’t make the sounds you may think they do when they swim - not even 30+ ton humpback whales. You won’t find any “friction-based” sounds until another substance (air, sand, plants) gets involved. So don’t expect to pop a mic in and get awesome recordings of fish swimming. BUT, assuming your underwater recording aspirations are towards narrative rather than documentation (phonographic), you most likely want to aim for those preconceived sounds, as they will probably be most useful in the end product. You’ll need to come up with creative ways to reproduce those sounds. Keep in mind that many of those sounds heard in film and television weren’t originally recorded with hydrophones (remember the mic/condom technique mentioned before).
"Don’t be afraid to try unconventional things; you’re recording in an unconventional environment!"
Technique
As with any sort of recording, a trial and error approach will usually yield the best results - but here are a few tips to get you started:
- Water Body Selection: If your goal is to get some movement or small bubbles, a bathtub or small tank, plastic bin, or even a cup might be your best and easiest choice. Small sounds don’t need much room to develop. However, if you have heavy transient material, a small pool may not be your best option as you will deal with a lot of flutter echo that may mess with your recordings. Maybe you like the resulting slap - just be sure you take it into account when planning your record. You’ll rarely deal with unwanted slap and echo in open water, but you’ll have to be careful about stray sounds as sound travels extremely far underwater. I once heard a jet ski 7 minutes before I could see it! If you’re in open water, deeper areas are better, as they minimize noise pollution. Colder water transmits sound better as well.
- Stereo Issues: To tackle this one, you need to first understand a few basics about how human hearing works. In the simplest of terms, your brain is accustomed to the shape of your head. The average adult’s ears are about 17.5cm apart. Your brain calculates the location of a sound based on the timing difference (in air) of the sound arriving to one ear and then the other. If a sound is generated directly on plane with your ears, it will arrive at your ears at the same time. If it’s off to one side or the other, it will arrive at one ear before the other. Also at work here is the shape of your face and ears, which slightly mask certain frequencies (so subtle that you can’t consciously hear the effects), depending on the direction of the source of the sound. Your brain takes all of these differences into consideration and figures out where the sound originated. This brain process is often called “spacial localization.” Now, because sound travels faster underwater, your brain can no longer properly localize sounds. I won’t get into how stereo and binaural recording and playback work, but essentially, you can’t get two hydrophones far enough away from each other to get a proper “stereo” image without drastically changing the sound (remember how frequencies separate quickly in water). The best you can hope for is to “stereoize” in post (by editing or “worldizing”), or fake it with proximity.
- Proximity: You can “fake” stereo with proximity. If you have two hydrophones underwater and move your source close to one and then close to another, you’ll have a sort of “proximity stereo” recording, where the amplitude of the source from one mic to the other gives a sort of stereo effect. It’s not perfect, but it can work. If you’re going for a stereo sound for narrative purposes, it might be easier to construct the stereo image during the editing or mixing process. You can, however, create a lot of interesting movement using the proximity effect of a hydrophone. Play with the effect so you have another tool in your belt!
- Movement Is Your Friend: Sure, there’s always a place for steady drones and ambient style recordings, but for the most part, movement within the recording is what makes things interesting - particularly movement that incorporates air and bubbles. Your recording should change over time to keep it interesting. Don’t be afraid to move the microphone during the recording. Most standard hydrophones don’t really make a sound as they move through the water, so no need to worry about noise generated from movement. Moving it during a recording can help add to some of the movement simply because of doppler and proximity effects.
- Be Careful With Cable Handling Noise: A hydrophone is essentially just a waterproof contact mic, so it is extremely sensitive to handling noise, even on the cable and connector! Be mindful of your cable handling to minimize excess noise.
Hopefully that’s enough to get you started! Be creative and inventive with your recording sessions. Don’t be afraid to try unconventional things; you’re recording in an unconventional environment! Most importantly, have fun and keep recording!

Want to share this post?